
Writing a Book with GitHub
A lot of time and effort go into writing a book. It gets even harder when you need to collaborate with your editor and make revisions.
All of the edits must be reviewed and approved. Do you keep the change or do you toss it? Multiply this by hundreds of edits (or in my case thousands) and the task is enormous. Even when you think you nailed a paragraph, it can come back shredded (that means it's better in the end, right?).
When I wrote Working with OmniFocus I used GitHub to manage all of the revisions and help me see the edits. I was doing all of my writing for the blog in Markdown and I didn't want to change that workflow for the book. It turned out to be a great choice.
File Layout
I kept the file structure for the book really simple. A single markdown file for the outline and a single file for each chapter. I wrote the first draft for the entire book before I went back to start editing. When I finished editing each chapter I uploaded a copy of it to a DropBox folder I share with my editor. That allowed her to get started while I kept editing the later chapters.

I created a local git repository on my computer with the GitHub for Mac application. I could do it via command line, but I like the UI that comes with the app. Every time I made edits to the book, I committed the changes to save a history of the work I was doing.
Receiving Edits
When my editor finished each chapter, she let me know via email or text. I created a new branch in my local repository that I used to overwrite my version of the chapter with hers. That gave me her edits on my machine with the GitHub application waiting for me to merge those changes. I read through each edit and made decisions.

It was simple to see any adds, deletes, or comments that she made. The interface clearly showed what had been done to the file. If I needed to revise what she had done, I could jump over to the file in Sublime Text, make the edits, and save it. When I was done acting on her edits, I committed the changes and then merged them into my master branch in GitHub.
Version History
A big benefit of this process is the version history. I can look back on every commit I have made and roll back to that point in time. It keeps each revision and allows me to come back to them as needed. This is a huge load off of my brain. I don't have to worry about making a change - I know I can always undo it or look back on what I did and see the progression.
I plan to use this method for any books I write in the future. I use GitHub quite a bit, so I'm comfortable with it and it makes the editing process painless. Well, at least logistically.
Other mentions
There are many ways you can manage and store your writing projects. Some people prefer cloud storage services (like Dropbox) or online editors (like Google Docs), while others use desktop applications (like Microsoft Word). I use something called GitHub.
GitHub: It’s for More Than Just Code
I use Git and GitHub to store and access all of my writing. Git is an effective tool you can use to track document changes, plus you can upload to GitHub super-fast. It’s also quick and simple to download your work to a second or third device.
If you’ve never heard of GitHub, it’s the world’s most popular destination to store and maintain open-source code. That might sound like a crazy place to host your writing, but it’s not! After all, code is just lines and lines of text, like your article, story, or dissertation.
Around 2013, GitHub started encouraging people to create repositories for all kinds of information, not just code. GitHub never really left its coding roots, but some people still use it to store writing and other non-coding projects. For example, one person used Git and GitHub to write an instructional book, while another wrote a novel. Poke around on Google, and you find all kinds of crazy uses for GitHub.
What Are Git and GitHub?
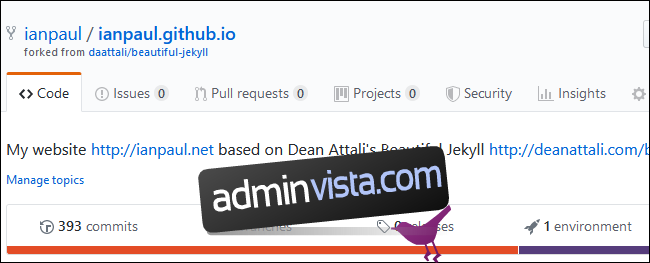
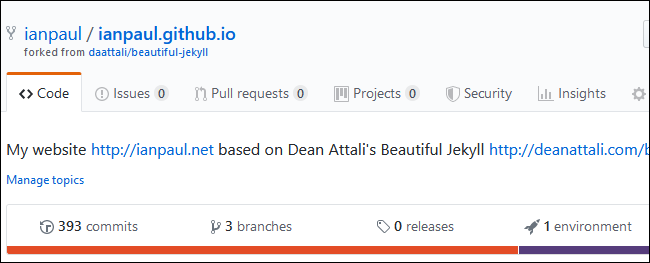 The informational section of a GitHub repository.
Git is an open-source program created by Linus Torvalds, of Linux fame. Git tracks changes to documents and makes it easier for multiple people to work on the same document remotely. In tech-speak, it’s called a distributed version control system (or distributed VCS). Git doesn’t arbitrarily save versions of your documents at set intervals. Instead, it stores changes to your documents only when you tell it to.
Your documents form a repository (or repo), which is just a fancy term for your project folder. Your Documents folder in Windows, for example, would be a repository if you used Git to manage it (but don’t do that).
When you store changes to your documents in Git, it’s called a “commit.” A commit is just a record of the most recent changes you made to a document. Each commit is assigned a long string of numbers and letters as its ID.
If you call up a past commit by its ID, you don’t see the entire project as you do in Word’s document history. You only see the most recent changes when that commit was made. However, this doesn’t mean the entire project wasn’t recorded. You can delete all your writing from a project folder and still get the most recent version back with a few git commands. You can even go back and see how the project looked a week ago, or six months ago.
You can also include messages to each commit, which is very useful. For example, if you write something but aren’t sure you want to keep it, just do a commit. The section then survives in your commit history even if you delete it from the project later.
Git works best on the command line, which is a great advantage but also has its downsides. The command line is fine to create commits and upload changes. However, if you want to view a commit history, it’s not ideal.
This is why many people like GitHub—a popular online service that offers a web interface for your Git repositories. On GitHub, you can easily view past commits, as well as download your writing to multiple PCs.
Together, Git and GitHub let me control my version history at a granular level. And it’s easy to get my writing on any PC that can run a Bash command line which, these days, includes Windows, Mac, Linux, and Chrome OS machines.
Plain Text Files Make Things Easy
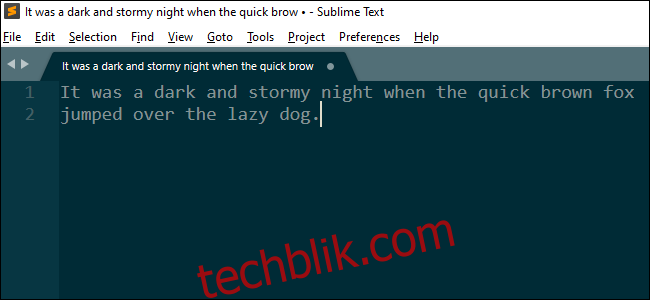
 Git can help save your writing, but it can’t make you a better writer.
Git and GitHub do commits on pretty much any file type for writing, although it works best with plain text. If you write in Microsoft Word, it’ll work, but you won’t be able to see your past commits on the command line or in GitHub. Instead, you have to call up a past commit on the command line (called a “checkout”), and then open your Word file. The Word file then looks just as it did when you made the original commit, and you can get back to your current version with another quick command.
If you use Scrivener, that works, too. Scrivener saves files as text, so it also displays past commits on GitHub and the command line. But Scrivener also saves data that’s important to the program, but not to you. In each commit, you’ll end up with a lot of junk that makes it difficult to read.
I use plain text files because that’s all you need to string words together, especially in your first few drafts.
Getting Started with Git
Let’s get into the technical details of how this all works. We’ll start with PC, and then move up to the cloud with GitHub.
To get started, you need the terminal program on macOS or Linux. If your computer runs Windows 10, you have to install Ubuntu or another Linux distribution via the Windows Subsystem for Linux (WSL), which is pretty easy. You can check out our tutorial on how to install the Linux Bash shell on Windows 10. Or, if you use an older version of Windows, you can use Cygwin to get a Bash shell.
Open your terminal and navigate to the folder you want to use as a Git repository. For our purposes, let’s say we have a folder called “MyNovel” in the Documents folder. Note that there’s no space between the words of our Git repo. You’ll make your life easier if you do it this way as Bash doesn’t like spaces, and dealing with them gets confusing.
Next, navigate to the MyNovel folder in the terminal. To do this in Windows 10, the command is:
cd /mnt/c/Users/[YourUserName]/Documents/MyNovel
Any WSL command that interacts with files saved in Windows needs must use /mnt/. Also, note that the lowercase “c” indicates the drive you’re on. If your files are on a “D:/” drive, then you use /d/.
For macOS and Linux the command is much simpler:
cd ~/Documents/MyNovel
From here, the commands are the same.
Now, we have to initialize the MyNovel folder as a Git repository. This command works whether you’re just starting a fresh novel or already have some saved files inside.
git init
Your folder is now a Git repository. Don’t believe me? Type this in:
ls -a
That command asks the computer to list everything in the current folder, including hidden items. You should see something listed towards the top called “.git” (note the period). The hidden “.git” folder is where your document version history is saved. You should never need to open this, but it has to be there.
The First Commit
Before we do our first commit Git wants to know your name and email address. Git uses this information to identify who made the commit, and that information is included in the commit log. For practical purposes, this doesn’t matter since writers are typically flying solo, but Git still requires it.
To set your email and address do the following:
git config --global user.email "[Your email]"

git config --global user.name "[Your name]"
That’s it. Now on to the first commit.
Let’s assume there are three documents in the “MyNovel” folder called: “Chapter1,” “Chapter2,” and “Chapter3.” To save changes, we have to tell Git to track these files. To do this, type:
git add .
The period tells Git to monitor all untracked files in the folder (i.e. files for which you want to create histories). This command also tells Git to prepare any currently tracked files that have been changed. This process is called staging files for commit.
For our purposes, staging isn’t so important, but it can be useful. If you make changes to Chapter 2 and Chapter 3, but only want to commit the changes in Chapter 2, you would stage Chapter 2 like so:
git add Chapter2.doc
This tells Git you want to get the changes in Chapter 2 ready for commit, but not Chapter 3.
Now, it’s time for the first commit:
Git commit -m "This is my first commit."
The “-m” is called a flag, and it tells Git you want to make a commit and tack on a message, which you see between the quotation marks. I like to use my commit messages to mark word counts. I also use them to note special information, such as: “This commit includes an interview with the CEO of Acme Widgets.”
If I’m writing a story, I might include a message that says: “This commit has the new scene where the dog runs away.” Helpful messages make it easier to find your commits later.
Now that we’ve started tracking our documents, it’s time to put our writing in the cloud with GitHub. I use GitHub as an extra backup, a reliable place to look at my document changes, and a way to access my stuff on multiple PCs.
Getting Started with GitHub
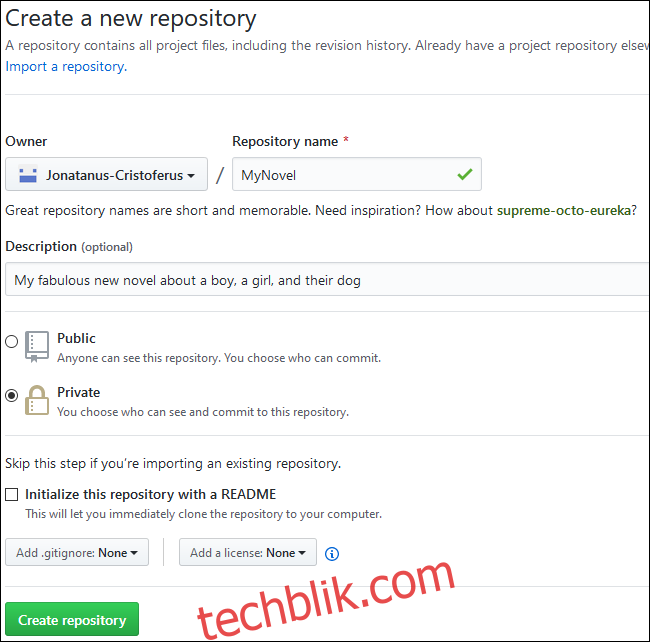
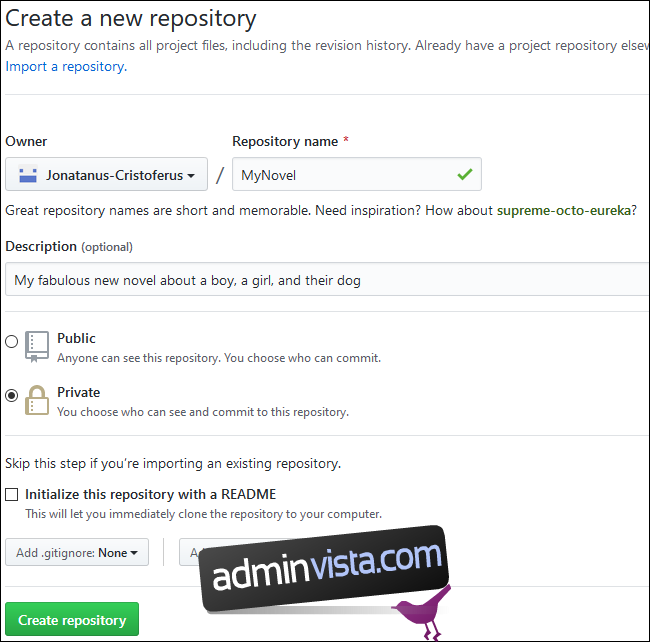
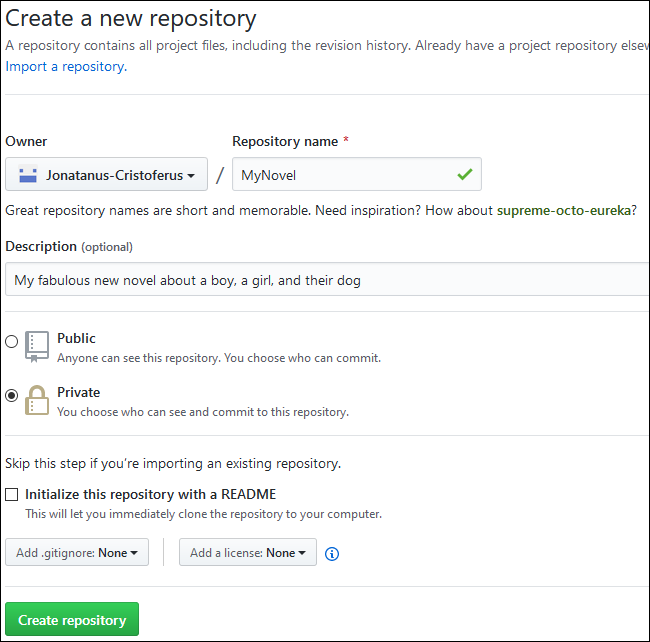 You fill out the form to create a new GitHub repository.
First, you need to sign up for a free account on GitHub (you don’t need a paid account to create private repositories). However, you can only collaborate with up to three people on a private repo. If you have a team of five or more working on an article, you need to sign up for a Pro account ($7 per month, at this writing).
After you create your account, let’s make a new repo. Sign in to your account and go to https://github.com/new.
The first thing we need to do is name the repository. You can use the same name you used for the folder on your PC. Under “Repository Name,” type “MyNovel.”
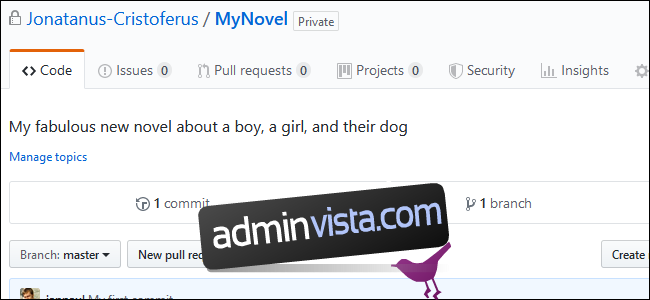
The “Description” is optional, but I like to use it. You can type something like, “My fabulous new novel about a boy, a girl, and their dog,” etc.
Next, select the “Private” radio button, but don’t check the box called “Initialize this repository with a README.” We don’t want to do that, because we already have a repository on our PC. If we create a README file right now, it makes things harder.
Next, click “Create Repository.” Under, “Quick setup—if you’ve done this kind of thing before,” copy the URL. It should look something like this:
https://github.com/[Your GitHub User Name]/MyNovel.git
Now, it’s back to the desktop and our beloved command line.
Push Your Desktop Repository to the Cloud
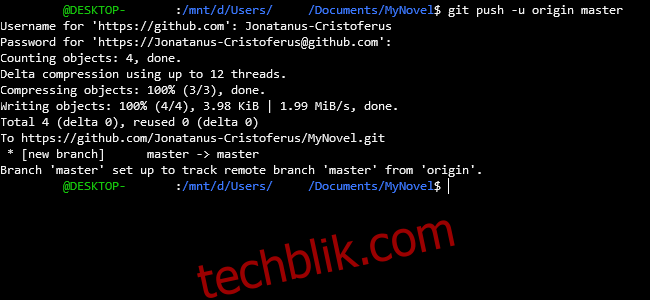
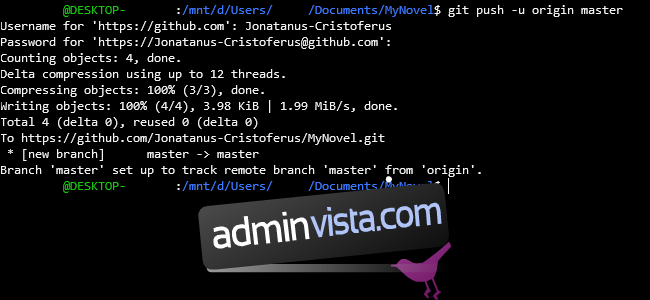
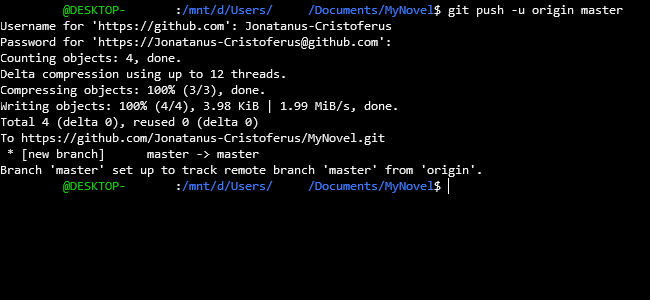 Using Git on the command line.
The first time you connect a repo to GitHub, you have to use a few specialized commands. The first one is:
git remote add origin https://github.com/[Your GitHub User Name]/MyNovel.git
This tells Git a remote repository is the origin of “MyNovel.” The URL then points Git toward that remote origin. Don’t get too hung up on the term “origin;” it’s just a convention. You can call it “fluffy” if you want to—origin is just easier since it’s the most common way to use Git.
When you upload new changes with Git, it’s called a “push.” When you download changes, it’s called a “pull” or “fetch.” Now, it’s time to push your first commit to GitHub. Here’s what you do:
git push -u origin master
You’ll be prompted to type your GitHub username and password. If you type your credentials correctly, everything uploads, and you’re good to go.
If you want more security for your GitHub uploads, you can use an SSH key. This allows you to use a single password for the SSH key to upload, so you don’t have to type your full GitHub credentials each time. Plus, only someone with the SSH key can upload file changes.
If you want more info on SSH keys, GitHub has full instructions on how to use them. You can also save your Git credentials on your PC.
That’s it! Now, when you want to commit changes to your files, you can do so with these three short commands (after you navigate to the “MyNovel” folder):
git add .
Translation: “Hey, Git stage for commit all untracked files, as well as new changes to files you’re already tracking.”
git commit -m "1,000 words on the new iPhone review."
Translation: “Hey Git, save these changes alongside this message.”
git push origin master
Translation: “Hey Git, upload the changes to the origin version of this project on GitHub from my master copy on this PC.”
Git and GitHub Bonus Tips
That’s pretty much it, but here are a few extra tips to make your experience with Git and GitHub even better:
View Past Commits
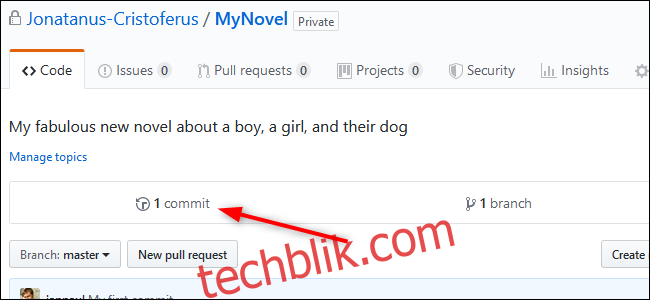
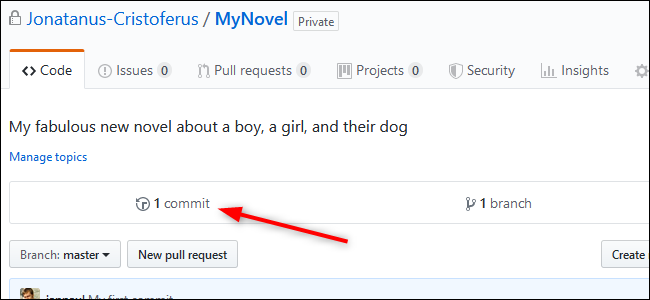 You can use GitHub to see past commits.
To view past commits, go to your MyNovel repository on GitHub. Toward the top the main page, under the “Code >” tab, you see a section that says, “[X] commits.”
Click it, and you see a list of all your commits. Click the commit you want, and you see your text (if you typed it in plain text and not Word, that is). Everything highlighted in green was new text when the commit was created; everything in red was deleted.
Use the Pull Command
It’s easy to grab a new repository on a different machine. Just navigate to where you want to save the repo on the new machine, such as cd ~/Documents. Then, type:
git pull https://github.com/[Your GitHub User Name]/MyNovel.git
Type your credentials, if prompted, and in a few seconds, you’ll be ready to go. Now, commit new changes, and then send them back to GitHub via git push origin master. When you get back to the PC where you usually work, just open the command line, navigate to your project folder, and type in git pull. The new changes will download, and just like that your writing project is up to date across your devices.
Don’t Cross Streams
Most of the time writing isn’t a team effort and involves only one person. Because of that, this article uses Git in a way that wouldn’t work for a multi-person project. Specifically, we made edits directly to the master version of our novel instead of creating what are called “branches.” A branch is a practice version of the novel where you can make changes without affecting the original master. It’s like having two different copies of your novel existing in parallel with neither affecting the other. If you like the changes in the practice branch you can merge them into the master version (or master branch). If you don’t want to do that, that’s fine too. Just throw away the practice branch.
Branches are very powerful, and using them would be the primary workflow with multiple writers on a single project. Solo writers don’t really need to use branches, in my opinion—as long as you don’t make differing changes to the master branch at the same time on multiple PCs.
For example, you should complete your work on your desktop, do your commits, and then push the changes to GitHub. Then go to your laptop and pull all the new changes down before you make any further edits. If you don’t, you might end up with what Git calls “conflicts.” That’s when Git says, “Hey, there are changes in GitHub and on this PC that don’t match. Help me figure this out.”
Sorting your way out of a conflict can be a pain, so it’s best to avoid it whenever possible.
Once you get started with Git, there are tons of things you can learn, such as branching, the difference between a fetch and a pull, what GitHub’s pull requests are, and how to deal with the dreaded conflict.
Git can seem complicated to newcomers, but once you get the hang of it, it’s a powerful tool you can use to manage and store your writing.
您可以通过多种方式管理和存储您的写作项目。 有些人更喜欢云存储服务(如 Dropbox)或在线编辑器(如 Google Docs),而另一些人则使用桌面应用程序(如 Microsoft Word)。 我使用一个叫做 GitHub 的东西。
目录
GitHub:不仅仅是代码
我使用 Git 和 GitHub 来存储和访问我所有的写作。 Git 是一个可用于跟踪文档更改的有效工具,此外,您还可以超快速地上传到 GitHub。 将您的作品下载到第二台或第三台设备也非常简单快捷。
如果您从未听说过 GitHub,它是世界上最流行的存储和维护开源代码的目的地。 这听起来像是一个疯狂的地方来承载你的写作,但事实并非如此! 毕竟,代码只是一行又一行的文本,就像你的文章、故事或论文一样。
2013年前后, GitHub 开始鼓励人们创建存储库 用于各种信息,而不仅仅是代码。 GitHub 从来没有真正离开过它的编码根源,但有些人仍然使用它来存储写作和其他非编码项目。 例如,一个人使用 Git 和 GitHub 写一本指导书而另一个 写了一本小说. 在 Google 上四处逛逛,你会发现 GitHub 的各种疯狂用途。
什么是 Git 和 GitHub?
GitHub 存储库的信息部分。
Git 是一个开源程序,由 莱纳斯·托瓦兹,Linux名声大噪。 Git 跟踪对文档的更改,并使多人远程处理同一个文档变得更加容易。 在技术上,它被称为分布式版本控制系统(或分布式 VCS)。 Git 不会以设定的时间间隔任意保存文档的版本。 相反,它仅在您告诉它时才存储对文档的更改。
您的文档形成一个存储库(或 repo),这只是您的项目文件夹的一个花哨的术语。 例如,如果您使用 Git 来管理 Windows 中的 Documents 文件夹(但不要这样做),它将是一个存储库。
当您在 Git 中存储对文档的更改时,称为“提交”。 提交只是您对文档所做的最新更改的记录。 每个提交都被分配一长串数字和字母作为其 ID。
如果您通过其 ID 调用过去的提交,您不会像在 Word 的文档历史记录中那样看到整个项目。 您只会在提交时看到最近的更改。 但是,这并不意味着没有记录整个项目。 您可以从项目文件夹中删除所有写作内容,但仍然可以使用一些 git 命令恢复最新版本。 你甚至可以回去看看一周前或六个月前项目的样子。
您还可以在每个提交中包含消息,这非常有用。 例如,如果您写了一些东西,但不确定是否要保留它,只需进行提交即可。 即使您稍后将其从项目中删除,该部分也会保留在您的提交历史记录中。
Git 在命令行上效果最好,这是一个很大的优势,但也有它的缺点。 命令行可以很好地创建提交和上传更改。 但是,如果您想查看提交历史记录,这并不理想。
这就是为什么许多人喜欢 GitHub——一种流行的在线服务,它为你的 Git 存储库提供 Web 界面。 在 GitHub 上,您可以轻松查看过去的提交,以及将您的作品下载到多台 PC。
Git 和 GitHub 一起让我可以在粒度级别控制我的版本历史。 在任何可以运行 Bash 命令行的 PC 上进行写作都很容易,如今,这些命令行包括 Windows、Mac、Linux 和 Chrome OS 机器。
纯文本文件使事情变得简单
 Git 可以帮助保存你的写作,但它不能让你成为一个更好的作家。
Git 和 GitHub 几乎可以在任何文件类型上进行提交以进行写入,尽管它最适用于纯文本。 如果你用 Microsoft Word 编写,它会工作,但你将无法在命令行或 GitHub 中看到你过去的提交。 相反,您必须在命令行上调用过去的提交(称为“签出”),然后打开您的 Word 文件。 然后,Word 文件看起来就像您进行原始提交时一样,您可以使用另一个快速命令返回到当前版本。
如果你使用 书记员,这也有效。 Scrivener 将文件保存为文本,因此它还会在 GitHub 和命令行上显示过去的提交。 但 Scrivener 也会保存对程序很重要但对您不重要的数据。 在每次提交中,您最终都会得到很多难以阅读的垃圾。
我使用纯文本文件,因为这就是将单词串在一起所需的全部内容,尤其是在最初的几份草稿中。
开始使用 Git
让我们深入了解这一切如何运作的技术细节。 我们将从 PC 开始,然后通过 GitHub 迁移到云。
要开始使用,您需要 macOS 或 Linux 上的终端程序。 如果您的计算机运行 Windows 10,则必须通过适用于 Linux 的 Windows 子系统 (WSL) 安装 Ubuntu 或其他 Linux 发行版,这非常容易。 您可以查看我们关于如何在 Windows 10 上安装 Linux Bash shell 的教程。或者,如果您使用旧版本的 Windows,您可以使用 Cygwin 获取 Bash shell。
打开终端并导航到要用作 Git 存储库的文件夹。 出于我们的目的,假设我们在 Documents 文件夹中有一个名为“MyNovel”的文件夹。 请注意,我们的 Git 存储库的单词之间没有空格。 如果你这样做,你会让你的生活更轻松,因为 Bash 不喜欢空格,并且处理它们会让人感到困惑。
接下来,导航到终端中的 MyNovel 文件夹。 要在 Windows 10 中执行此操作,命令是:
cd /mnt/c/Users/[YourUserName]/Documents/MyNovel
任何与保存在 Windows 中的文件交互的 WSL 命令都必须使用 /mnt/。 另外,请注意小写的“c”表示您所在的驱动器。 如果您的文件位于“D:/”驱动器上,则使用 /d/。
对于 macOS 和 Linux,命令要简单得多:
cd ~/Documents/MyNovel
从这里开始,命令是相同的。
Wi-Fi 摄像头不仅仅是录制视频现在,我们必须将 MyNovel 文件夹初始化为 Git 存储库。 无论您是刚开始写一本新小说还是里面已经有一些保存的文件,此命令都有效。
git init
您的文件夹现在是一个 Git 存储库。 不相信我? 输入:
ls -a
该命令要求计算机列出当前文件夹中的所有内容,包括隐藏项目。 您应该会在顶部看到名为“.git”的内容(注意句号)。 隐藏的“.git”文件夹是保存文档版本历史的地方。 你永远不需要打开它,但它必须在那里。
第一次提交
在我们进行第一次提交之前,Git 想知道您的姓名和电子邮件地址。 Git 使用此信息来识别提交者,并且该信息包含在提交日志中。 出于实际目的,这并不重要,因为作家通常是独自飞行,但 Git 仍然需要它。
要设置您的电子邮件和地址,请执行以下操作:
git config --global user.email "[Your email]"

git config --global user.name "[Your name]"
而已。 现在开始第一次提交。
假设“MyNovel”文件夹中有三个文档,名为:“Chapter1”、“Chapter2”和“Chapter3”。 要保存更改,我们必须告诉 Git 跟踪这些文件。 为此,请键入:
git add .
该句点告诉 Git 监视文件夹中所有未跟踪的文件(即您要为其创建历史记录的文件)。 此命令还告诉 Git 准备任何当前跟踪的已更改的文件。 这个过程称为提交的暂存文件。
就我们的目的而言,分期并不那么重要,但它可能很有用。 如果您对第 2 章和第 3 章进行了更改,但只想提交第 2 章中的更改,您可以像这样暂存第 2 章:
git add Chapter2.doc
这告诉 Git 你想让第 2 章中的更改准备好提交,而不是第 3 章。
现在,是第一次提交的时候了:
Git commit -m "This is my first commit."
“-m”被称为标志,它告诉 Git 你想要提交并附加一条消息,你可以在引号之间看到它。 我喜欢使用我的提交信息来标记字数。 我还使用它们来记录特殊信息,例如:“此提交包括对 Acme Widgets 首席执行官的采访。”
如果我正在写一个故事,我可能会包含一条消息,说:“这个提交有狗逃跑的新场景。” 有用的消息使以后更容易找到您的提交。
现在我们已经开始跟踪我们的文档,是时候使用 GitHub 将我们的文章放到云中了。 我使用 GitHub 作为额外的备份、查看文档更改的可靠位置以及在多台 PC 上访问我的资料的方法。
开始使用 GitHub
 您填写表单以创建新的 GitHub 存储库。
首先,您需要注册一个免费帐户 GitHub (您不需要付费帐户来创建私人存储库)。 但是,您最多只能与三个人在私人仓库中协作。 如果您有一个五人或五人以上的团队在撰写一篇文章,您需要注册一个 Pro 帐户(在撰写本文时每月 7 美元)。
创建帐户后,让我们创建一个新的存储库。 登录您的帐户并转到 https://github.com/new.
我们需要做的第一件事是命名存储库。 您可以使用与 PC 上的文件夹相同的名称。 在“存储库名称”下,输入“MyNovel”。
“描述”是可选的,但我喜欢使用它。 您可以输入诸如“我关于一个男孩、一个女孩和他们的狗的精彩新小说”之类的内容。
接下来,选择“Private”单选按钮,但不要选中名为“Initialize this repository with a README”的框。 我们不想这样做,因为我们的 PC 上已经有一个存储库。 如果我们现在创建一个 README 文件,事情就会变得更加困难。
接下来,单击“创建存储库”。 在“快速设置——如果您以前做过这种事情”下,复制 URL。 它应该看起来像这样:
https://github.com/[Your GitHub User Name]/MyNovel.git
现在,它又回到了桌面和我们心爱的命令行。
将您的桌面存储库推送到云端
 在命令行上使用 Git。
第一次将 repo 连接到 GitHub 时,您必须使用一些专门的命令。 第一个是:
git remote add origin https://github.com/[Your GitHub User Name]/MyNovel.git
这告诉 Git 一个远程存储库是“MyNovel”的来源。 然后 URL 将 Git 指向该远程源。 不要太拘泥于“起源”这个词; 这只是一个约定。 如果你愿意,你可以称它为“fluffy”——origin 更简单,因为它是使用 Git 的最常见方式。
当您使用 Git 上传新更改时,这称为“推送”。 当您下载更改时,称为“拉取”或“获取”。 现在,是时候将您的第一个提交推送到 GitHub。 这是你要做的:
git push -u origin master
系统将提示您输入 GitHub 用户名和密码。 如果您正确输入凭据,所有内容都会上传,一切顺利。
如果您希望 GitHub 上传更安全,可以使用 SSH 密钥。 这允许您使用单个密码来上传 SSH 密钥,因此您不必每次都输入完整的 GitHub 凭据。 另外,只有拥有 SSH 密钥的人才能上传文件更改。
如果您想了解有关 SSH 密钥的更多信息, GitHub 有关于如何使用它们的完整说明. 你也可以 将您的 Git 凭据保存在您的 PC 上.
而已! 现在,当您想要提交对文件的更改时,可以使用以下三个简短命令(在导航到“MyNovel”文件夹后):
git add .
翻译:“嘿,Git 阶段,用于提交所有未跟踪的文件,以及对您已经跟踪的文件的新更改。”
git commit -m "1,000 words on the new iPhone review."
翻译:“嘿 Git,将这些更改保存在此消息旁边。”
git push origin master
翻译:“嘿 Git,从我在这台 PC 上的主副本上传对 GitHub 上该项目原始版本的更改。”
Git 和 GitHub 奖励提示
差不多就是这样,但这里有一些额外的技巧可以让你更好地使用 Git 和 GitHub:
如何访问和更改 Microsoft Teams 设置查看过去的提交
 您可以使用 GitHub 查看过去的提交。
要查看过去的提交,请转到 GitHub 上的 MyNovel 存储库。 在主页的顶部,在“代码”选项卡下,您会看到一个部分,上面写着“[X] 承诺。”
单击它,您会看到所有提交的列表。 点击你想要的提交,你会看到你的文本(如果你是用纯文本而不是 Word 输入的)。 以绿色突出显示的所有内容都是创建提交时的新文本; 红色的一切都被删除了。
使用拉取命令
在不同的机器上获取一个新的存储库很容易。 只需导航到您要在新机器上保存 repo 的位置,例如 cd ~/Documents。 然后,键入:
git pull https://github.com/[Your GitHub User Name]/MyNovel.git
如果出现提示,请键入您的凭据,几秒钟后,您就可以开始了。 现在,提交新的更改,然后通过 git push origin master 将它们发送回 GitHub。 当您回到您通常工作的 PC 时,只需打开命令行,导航到您的项目文件夹,然后输入 git pull。 新的更改将下载,就像您的写作项目在您的设备上是最新的一样。
不要跨流
大多数时候写作不是团队合作,只涉及一个人。 因此,本文以一种不适用于多人项目的方式使用 Git。 具体来说,我们直接对我们小说的主版本进行了编辑,而不是创建所谓的“分支”。 分支是小说的练习版,可以在不影响原版主的情况下进行修改。 这就像你的小说有两个不同的副本同时存在,而不会影响另一个。 如果您喜欢练习分支中的更改,您可以将它们合并到主版本(或主分支)中。 如果您不想这样做,那也没关系。 干脆扔掉练习枝。
分支非常强大,使用它们将是单个项目中多个编写者的主要工作流程。 在我看来,Solo writers 并不真的需要使用分支——只要您不在多台 PC 上同时对 master 分支进行不同的更改。
例如,您应该在桌面上完成工作,进行提交,然后将更改推送到 GitHub。 然后在您进行任何进一步编辑之前,转到您的笔记本电脑并拉下所有新更改。 如果你不这样做,你最终可能会遇到 Git 所说的“冲突”。 那时 Git 会说:“嘿,GitHub 和这台 PC 上的更改不匹配。 帮我解决这个问题。”
解决冲突可能会很痛苦,因此最好尽可能避免。
一旦你开始使用 Git,你可以学到很多东西,比如分支、获取和拉取之间的区别、GitHub 的拉取请求是什么,以及如何处理可怕的冲突。
Git 对于新手来说可能看起来很复杂,但一旦你掌握了它,它就是一个强大的工具,你可以使用它来管理和存储你的写作。

There are many ways you can manage and store your writing projects. Some people prefer cloud storage services (like Dropbox) or online editors (like Google Docs), while others use desktop applications (like Microsoft Word). I use something called GitHub.
GitHub: It’s for More Than Just Code
I use Git and GitHub to store and access all of my writing. Git is an effective tool you can use to track document changes, plus you can upload to GitHub super-fast. It’s also quick and simple to download your work to a second or third device.
If you’ve never heard of GitHub, it’s the world’s most popular destination to store and maintain open-source code. That might sound like a crazy place to host your writing, but it’s not! After all, code is just lines and lines of text, like your article, story, or dissertation.
Around 2013, GitHub started encouraging people to create repositories for all kinds of information, not just code. GitHub never really left its coding roots, but some people still use it to store writing and other non-coding projects. For example, one person used Git and GitHub to write an instructional book, while another wrote a novel. Poke around on Google, and you find all kinds of crazy uses for GitHub.
What Are Git and GitHub?
 The informational section of a GitHub repository.
Git is an open-source program created by Linus Torvalds, of Linux fame. Git tracks changes to documents and makes it easier for multiple people to work on the same document remotely. In tech-speak, it’s called a distributed version control system (or distributed VCS). Git doesn’t arbitrarily save versions of your documents at set intervals. Instead, it stores changes to your documents only when you tell it to.
Your documents form a repository (or repo), which is just a fancy term for your project folder. Your Documents folder in Windows, for example, would be a repository if you used Git to manage it (but don’t do that).
When you store changes to your documents in Git, it’s called a “commit.” A commit is just a record of the most recent changes you made to a document. Each commit is assigned a long string of numbers and letters as its ID.
If you call up a past commit by its ID, you don’t see the entire project as you do in Word’s document history. You only see the most recent changes when that commit was made. However, this doesn’t mean the entire project wasn’t recorded. You can delete all your writing from a project folder and still get the most recent version back with a few git commands. You can even go back and see how the project looked a week ago, or six months ago.
Read the remaining 58 paragraphs
 Spread the love
Det finns många sätt du kan hantera och lagra dina skrivprojekt. Vissa människor föredrar molnlagringstjänster (som Dropbox) eller onlineredigerare (som Google Docs), medan andra använder skrivbordsprogram (som Microsoft Word). Jag använder något som heter GitHub.
Innehållsförteckning
- GitHub: Det är för mer än bara kod
- Vad är Git och GitHub?
- Oformaterade textfiler gör saker enkelt
- Komma igång med Git
- Komma igång med GitHub
- Skicka ditt skrivbordsarkiv till molnet
- Git och GitHub bonustips
GitHub: Det är för mer än bara kod
Jag använder Git och GitHub för att lagra och komma åt allt jag skriver. Git är ett effektivt verktyg som du kan använda för att spåra dokumentändringar, plus att du kan ladda upp till GitHub supersnabbt. Det är också snabbt och enkelt att ladda ner ditt arbete till en andra eller tredje enhet.
Om du aldrig har hört talas om GitHub är det världens mest populära destination för att lagra och underhålla öppen källkod. Det kan låta som en galen plats att vara värd för ditt skrivande, men det är det inte! När allt kommer omkring är kod bara rader och rader med text, som din artikel, berättelse eller avhandling.
Runt 2013, GitHub började uppmuntra människor att skapa arkiv för all slags information, inte bara kod. GitHub lämnade aldrig riktigt sina kodningsrötter, men vissa människor använder den fortfarande för att lagra skrivning och andra icke-kodande projekt. Till exempel använde en person Git och GitHub för att skriva en instruktionsbok, medan en annan skrev en roman. Leta runt på Google, och du hittar alla typer av galna användningsområden för GitHub.
Vad är Git och GitHub?
Informationsdelen av ett GitHub-förråd.
Git är ett program med öppen källkod skapat av Linus Torvalds, av Linux berömmelse. Git spårar ändringar i dokument och gör det lättare för flera personer att arbeta med samma dokument på distans. I tekniskt tal kallas det ett distribuerat versionskontrollsystem (eller distribuerad VCS). Git sparar inte godtyckligt versioner av dina dokument med bestämda intervall. Istället lagrar den ändringar i dina dokument endast när du säger till det.
Dina dokument bildar ett arkiv (eller repo), vilket bara är en fancy term för din projektmapp. Din dokumentmapp i Windows, till exempel, skulle vara ett arkiv om du använde Git för att hantera den (men gör inte det).
När du lagrar ändringar i dina dokument i Git kallas det en ”commit”. En commit är bara en registrering av de senaste ändringarna du gjort i ett dokument. Varje commit tilldelas en lång sträng med siffror och bokstäver som dess ID.
Om du ringer upp en tidigare commit med dess ID, ser du inte hela projektet som du gör i Words dokumenthistorik. Du ser bara de senaste ändringarna när commit gjordes. Detta betyder dock inte att hela projektet inte spelades in. Du kan ta bort allt du skriver från en projektmapp och fortfarande få tillbaka den senaste versionen med några git-kommandon. Du kan till och med gå tillbaka och se hur projektet såg ut för en vecka sedan, eller för sex månader sedan.
Du kan också inkludera meddelanden till varje commit, vilket är mycket användbart. Till exempel, om du skriver något men inte är säker på att du vill behålla det, gör bara en commit. Avsnittet finns sedan kvar i din commit-historik även om du tar bort det från projektet senare.
Git fungerar bäst på kommandoraden, vilket är en stor fördel men också har sina nackdelar. Kommandoraden är bra för att skapa commits och ladda upp ändringar. Men om du vill se en commit-historik är det inte idealiskt.
Det är därför många människor gillar GitHub — en populär onlinetjänst som erbjuder ett webbgränssnitt för dina Git-förråd. På GitHub kan du enkelt se tidigare åtaganden, samt ladda ner ditt skrivande till flera datorer.
Tillsammans låter Git och GitHub mig kontrollera min versionshistorik på en detaljerad nivå. Och det är lätt att få mitt skrivande på vilken dator som helst som kan köra en Bash-kommandorad som nuförtiden inkluderar Windows-, Mac-, Linux- och Chrome OS-maskiner.
Oformaterade textfiler gör saker enkelt
 Git kan hjälpa till att rädda ditt skrivande, men det kan inte göra dig till en bättre författare.
Git och GitHub förbinder sig i stort sett alla filtyper för att skriva, även om det fungerar bäst med vanlig text. Om du skriver i Microsoft Word kommer det att fungera, men du kommer inte att kunna se dina tidigare commits på kommandoraden eller i GitHub. Istället måste du anropa en tidigare commit på kommandoraden (kallad ”checkout”) och sedan öppna din Word-fil. Word-filen ser sedan ut precis som den gjorde när du gjorde den ursprungliga commit, och du kan återgå till din nuvarande version med ett annat snabbt kommando.
Om du använder Scrivener, det fungerar också. Scrivener sparar filer som text, så det visar också tidigare bekräftelser på GitHub och kommandoraden. Men Scrivener sparar också data som är viktig för programmet, men inte för dig. I varje commit kommer du att få mycket skräp som gör det svårt att läsa.
Jag använder vanliga textfiler eftersom det är allt du behöver för att sätta ihop ord, särskilt i dina första utkast.
Komma igång med Git
Låt oss gå in på de tekniska detaljerna om hur allt detta fungerar. Vi börjar med PC och flyttar sedan upp till molnet med GitHub.
Hur man lägger till alternativ text till ett objekt i PowerPointFör att komma igång behöver du terminalprogrammet på macOS eller Linux. Om din dator kör Windows 10 måste du installera Ubuntu eller en annan Linux-distribution via Windows Subsystem for Linux (WSL), vilket är ganska enkelt. Du kan kolla in vår handledning om hur du installerar Linux Bash-skalet på Windows 10. Eller, om du använder en äldre version av Windows, kan du använda Cygwin för att få ett Bash-skal.
Öppna din terminal och navigera till mappen du vill använda som ett Git-förråd. För våra syften, låt oss säga att vi har en mapp som heter ”MyNovel” i mappen Dokument. Observera att det inte finns något mellanslag mellan orden i vår Git-repo. Du kommer att göra ditt liv enklare om du gör det på det här sättet eftersom Bash inte gillar utrymmen och det blir förvirrande att hantera dem.
Navigera sedan till mappen MyNovel i terminalen. För att göra detta i Windows 10 är kommandot:
cd /mnt/c/Users/[YourUserName]/Documents/MyNovel
Alla WSL-kommandon som interagerar med filer som sparats i Windows måste använda /mnt/. Observera också att gemener ”c” indikerar den enhet du är på. Om dina filer finns på en ”D:/”-enhet, använder du /d/.
För macOS och Linux är kommandot mycket enklare:
cd ~/Documents/MyNovel
Härifrån är kommandona desamma.
Nu måste vi initiera MyNovel-mappen som ett Git-förråd. Det här kommandot fungerar oavsett om du precis har startat en ny roman eller redan har några sparade filer inuti.
git init
Din mapp är nu ett Git-förråd. Tro mig inte? Skriv in detta:
ls -a
Det kommandot ber datorn att lista allt i den aktuella mappen, inklusive dolda objekt. Du bör se något listat längst upp som heter ”.git” (notera punkten). Den dolda ”.git”-mappen är där din dokumentversionshistorik sparas. Du ska aldrig behöva öppna det här, men det måste finnas där.
Det första åtagandet
Innan vi gör vårt första åtagande vill Git veta ditt namn och din e-postadress. Git använder denna information för att identifiera vem som gjorde commit, och den informationen ingår i commit-loggen. För praktiska ändamål spelar detta ingen roll eftersom författare vanligtvis flyger solo, men Git kräver det fortfarande.
Gör följande för att ställa in din e-postadress och adress:
git config --global user.email "[Your email]"

git config --global user.name "[Your name]"
Det är allt. Nu till den första commit.
Låt oss anta att det finns tre dokument i mappen ”MyNovel” som heter: ”Chapter1”, ”Chapter2” och ”Chapter3.” För att spara ändringar måste vi berätta för Git att spåra dessa filer. För att göra detta, skriv:
git add .
Perioden säger åt Git att övervaka alla ospårade filer i mappen (dvs. filer som du vill skapa historik för). Detta kommando säger också åt Git att förbereda alla spårade filer som har ändrats. Denna process kallas iscensättningsfiler för commit.
För våra syften är iscensättning inte så viktigt, men det kan vara användbart. Om du gör ändringar i kapitel 2 och kapitel 3, men bara vill genomföra ändringarna i kapitel 2, skulle du stega kapitel 2 så här:
git add Chapter2.doc
Detta talar om för Git att du vill få ändringarna i kapitel 2 redo för commit, men inte kapitel 3.
Nu är det dags för första commit:
Git commit -m "This is my first commit."
”-m” kallas en flagga, och den talar om för Git att du vill göra en commit och slå på ett meddelande, som du ser mellan citattecken. Jag gillar att använda mina commit-meddelanden för att markera antalet ord. Jag använder dem också för att notera speciell information, såsom: ”Detta åtagande inkluderar en intervju med VD:n för Acme Widgets.”
Om jag skriver en berättelse, kan jag inkludera ett meddelande som säger: ”Det här engagemanget har den nya scenen där hunden springer iväg.” Användbara meddelanden gör det lättare att hitta dina åtaganden senare.
Nu när vi har börjat spåra våra dokument är det dags att lägga vårt skrivande i molnet med GitHub. Jag använder GitHub som en extra säkerhetskopia, en pålitlig plats att titta på mina dokumentändringar och ett sätt att komma åt mina saker på flera datorer.
Komma igång med GitHub
 Du fyller i formuläret för att skapa ett nytt GitHub-förråd.
Först måste du registrera dig för ett gratis konto på GitHub (du behöver inget betalkonto för att skapa privata arkiv). Du kan dock bara samarbeta med upp till tre personer på en privat repo. Om du har ett team på fem eller fler som arbetar med en artikel måste du registrera dig för ett Pro-konto ($7 per månad, när detta skrivs).
När du har skapat ditt konto, låt oss göra en ny repo. Logga in på ditt konto och gå till https://github.com/new.
Det första vi behöver göra är att namnge förvaret. Du kan använda samma namn som du använde för mappen på din PC. Under ”Repository Name”, skriv ”MyNovel.”
”Beskrivningen” är valfri, men jag gillar att använda den. Du kan skriva något som ”Min fantastiska nya roman om en pojke, en tjej och deras hund” osv.
Välj sedan alternativknappen ”Privat”, men markera inte rutan som heter ”Initiera detta förråd med en README.” Vi vill inte göra det, eftersom vi redan har ett arkiv på vår PC. Om vi skapar en README-fil just nu gör det det svårare.
Klicka sedan på ”Skapa arkiv.” Kopiera URL:en under ”Snabb installation – om du har gjort det här förut”. Det borde se ut ungefär så här:
https://github.com/[Your GitHub User Name]/MyNovel.git
Nu är det tillbaka till skrivbordet och vår älskade kommandorad.
Hur man skriver N med Tilde på toppen (Ñ ñ): Fullständig guideSkicka ditt skrivbordsarkiv till molnet
 Använder Git på kommandoraden.
Första gången du ansluter ett repo till GitHub måste du använda några specialiserade kommandon. Den första är:
git remote add origin https://github.com/[Your GitHub User Name]/MyNovel.git
Detta berättar för Git att ett fjärrlager är ursprunget till ”MyNovel.” URL:en pekar sedan Git mot det avlägsna ursprunget. Häng dig inte för mycket på termen ”ursprung;” det är bara en konvention. Du kan kalla det ”fluffigt” om du vill – ursprunget är bara enklare eftersom det är det vanligaste sättet att använda Git.
När du laddar upp nya ändringar med Git kallas det en ”push”. När du laddar ner ändringar kallas det ”pull” eller ”hämta”. Nu är det dags att göra ditt första åtagande till GitHub. Så här gör du:
git push -u origin master
Du kommer att bli ombedd att ange ditt GitHub-användarnamn och lösenord. Om du skriver in dina referenser korrekt laddas allt upp och du är igång.
Om du vill ha mer säkerhet för dina GitHub-uppladdningar kan du använda en SSH-nyckel. Detta gör att du kan använda ett enda lösenord för SSH-nyckeln att ladda upp, så att du inte behöver skriva in dina fullständiga GitHub-uppgifter varje gång. Dessutom kan bara någon med SSH-nyckeln ladda upp filändringar.
Om du vill ha mer information om SSH-nycklar, GitHub har fullständiga instruktioner om hur man använder dem. Du kan också spara dina Git-uppgifter på din PC.
Det är allt! Nu, när du vill göra ändringar i dina filer, kan du göra det med dessa tre korta kommandon (efter att du har navigerat till mappen ”MyNovel”):
git add .
Översättning: ”Hej, Git-stadiet för commit alla ospårade filer, såväl som nya ändringar av filer du redan spårar.”
git commit -m "1,000 words on the new iPhone review."
Översättning: ”Hej Git, spara dessa ändringar tillsammans med det här meddelandet.”
git push origin master
Översättning: ”Hej Git, ladda upp ändringarna till ursprungsversionen av detta projekt på GitHub från min huvudkopia på den här datorn.”
Git och GitHub bonustips
Det är ganska mycket det, men här är några extra tips för att göra din upplevelse med Git och GitHub ännu bättre:
Visa tidigare åtaganden
 Du kan använda GitHub för att se tidigare åtaganden.
För att se tidigare åtaganden, gå till ditt MyNovel-förråd på GitHub. Längst upp på huvudsidan, under fliken ”Kod”, ser du ett avsnitt som säger ”[X] begår.”
Klicka på den så ser du en lista över alla dina åtaganden. Klicka på den commit du vill ha så ser du din text (om du skrev den i vanlig text och inte i Word, alltså). Allt markerat i grönt var ny text när commit skapades; allt i rött raderades.
Använd kommandot Pull
Det är lätt att ta ett nytt arkiv på en annan maskin. Navigera bara till var du vill spara repet på den nya maskinen, till exempel cd ~/Documents. Skriv sedan:
git pull https://github.com/[Your GitHub User Name]/MyNovel.git
Skriv in dina referenser, om du uppmanas, och inom några sekunder är du redo att gå. Gör nu nya ändringar och skicka dem sedan tillbaka till GitHub via git push origin master. När du kommer tillbaka till datorn där du brukar arbeta, öppna bara kommandoraden, navigera till din projektmapp och skriv in git pull. De nya ändringarna kommer att laddas ner, och precis som att ditt skrivprojekt är uppdaterat på alla dina enheter.
Korsa inte strömmar
För det mesta är skrivandet inte en laginsats och involverar bara en person. På grund av det använder den här artikeln Git på ett sätt som inte skulle fungera för ett projekt med flera personer. Specifikt gjorde vi redigeringar direkt i huvudversionen av vår roman istället för att skapa vad som kallas ”grenar”. En gren är en övningsversion av romanen där du kan göra ändringar utan att påverka den ursprungliga mastern. Det är som att ha två olika kopior av din roman som existerar parallellt utan att någon av dem påverkar den andra. Om du gillar ändringarna i övningsgrenen kan du slå ihop dem i masterversionen (eller mastergrenen). Om du inte vill göra det går det också bra. Släng bara övningsgrenen.
Filialer är mycket kraftfulla, och att använda dem skulle vara det primära arbetsflödet med flera skribenter på ett enda projekt. Soloförfattare behöver egentligen inte använda grenar, enligt min mening – så länge du inte gör olika ändringar i mastergrenen samtidigt på flera datorer.
Till exempel bör du slutföra ditt arbete på skrivbordet, göra dina commits och sedan skicka ändringarna till GitHub. Gå sedan till din bärbara dator och dra ner alla nya ändringar innan du gör några ytterligare ändringar. Om du inte gör det kan du sluta med vad Git kallar ”konflikter.” Det är då Git säger, ”Hej, det finns förändringar i GitHub och på den här datorn som inte matchar. Hjälp mig ta reda på det här.”
Att sortera sig ur en konflikt kan vara jobbigt, så det är bäst att undvika det när det är möjligt.
När du väl kommit igång med Git, finns det massor av saker du kan lära dig, som förgrening, skillnaden mellan en apport och en pull, vad GitHubs pull-förfrågningar är och hur man hanterar den fruktade konflikten.
Git kan verka komplicerat för nykomlingar, men när du väl fått kläm på det är det ett kraftfullt verktyg du kan använda för att hantera och lagra ditt skrivande.
There are many ways you can manage and store your writing projects. Some people prefer cloud storage services (like Dropbox) or online editors (like Google Docs), while others use desktop applications (like Microsoft Word). I use something called GitHub.
GitHub: Its for More Than Just Code
I use Git and GitHub to store and access all of my writing. Git is an effective tool you can use to track document changes, plus you can upload to GitHub super-fast. Its also quick and simple to download your work to a second or third device.
If youve never heard of GitHub, its the worlds most popular destination to store and maintain open-source code. That might sound like a crazy place to host your writing, but its not! After all, code is just lines and lines of text, like your article, story, or dissertation.
Around 2013, GitHub started encouraging people to create repositories for all kinds of information, not just code. GitHub never really left its coding roots, but some people still use it to store writing and other non-coding projects. For example, one person used Git and GitHub to write an instructional book, while another wrote a novel. Poke around on Google, and you find all kinds of crazy uses for GitHub.
What Are Git and GitHub?
 The informational section of a GitHub repository.
Git is an open-source program created by Linus Torvalds, of Linux fame. Git tracks changes to documents and makes it easier for multiple people to work on the same document remotely. In tech-speak, its called a distributed version control system (or distributed VCS). Git doesnt arbitrarily save versions of your documents at set intervals. Instead, it stores changes to your documents only when you tell it to.
Your documents form a repository (or repo), which is just a fancy term for your project folder. Your Documents folder in Windows, for example, would be a repository if you used Git to manage it (but dont do that).
When you store changes to your documents in Git, its called a commit. A commit is just a record of the most recent changes you made to a document. Each commit is assigned a long string of numbers and letters as its ID.
If you call up a past commit by its ID, you dont see the entire project as you do in Words document history. You only see the most recent changes when that commit was made. However, this doesnt mean the entire project wasnt recorded. You can delete all your writing from a project folder and still get the most recent version back with a few git commands. You can even go back and see how the project looked a week ago, or six months ago.
You can also include messages to each commit, which is very useful. For example, if you write something but arent sure you want to keep it, just do a commit. The section then survives in your commit history even if you delete it from the project later.
Git works best on the command line, which is a great advantage but also has its downsides. The command line is fine to create commits and upload changes. However, if you want to view a commit history, its not ideal.
This is why many people like GitHub—a popular online service that offers a web interface for your Git repositories. On GitHub, you can easily view past commits, as well as download your writing to multiple PCs.
Together, Git and GitHub let me control my version history at a granular level. And its easy to get my writing on any PC that can run a Bash command line which, these days, includes Windows, Mac, Linux, and Chrome OS machines.
Plain Text Files Make Things Easy
 Git can help save your writing, but it cant make you a better writer.
Git and GitHub do commits on pretty much any file type for writing, although it works best with plain text. If you write in Microsoft Word, itll work, but you wont be able to see your past commits on the command line or in GitHub. Instead, you have to call up a past commit on the command line (called a checkout), and then open your Word file. The Word file then looks just as it did when you made the original commit, and you can get back to your current version with another quick command.
If you use Scrivener, that works, too. Scrivener saves files as text, so it also displays past commits on GitHub and the command line. But Scrivener also saves data thats important to the program, but not to you. In each commit, youll end up with a lot of junk that makes it difficult to read.
I use plain text files because thats all you need to string words together, especially in your first few drafts.
Getting Started with Git
Lets get into the technical details of how this all works. Well start with PC, and then move up to the cloud with GitHub.
To get started, you need the terminal program on macOS or Linux. If your computer runs Windows 10, you have to install Ubuntu or another Linux distribution via the Windows Subsystem for Linux (WSL), which is pretty easy. You can check out our tutorial on how to install the Linux Bash shell on Windows 10. Or, if you use an older version of Windows, you can use Cygwin to get a Bash shell.
Open your terminal and navigate to the folder you want to use as a Git repository. For our purposes, lets say we have a folder called MyNovel in the Documents folder. Note that theres no space between the words of our Git repo. Youll make your life easier if you do it this way as Bash doesnt like spaces, and dealing with them gets confusing.
Next, navigate to the MyNovel folder in the terminal. To do this in Windows 10, the command is:
cd /mnt/c/Users/[YourUserName]/Documents/MyNovel
Any WSL command that interacts with files saved in Windows needs must use /mnt/. Also, note that the lowercase c indicates the drive youre on. If your files are on a D:/ drive, then you use /d/.
For macOS and Linux the command is much simpler:
cd ~/Documents/MyNovel
From here, the commands are the same.
Now, we have to initialize the MyNovel folder as a Git repository. This command works whether youre just starting a fresh novel or already have some saved files inside.
git init
Your folder is now a Git repository. Dont believe me? Type this in:
ls -a
That command asks the computer to list everything in the current folder, including hidden items. You should see something listed towards the top called .git (note the period). The hidden .git folder is where your document version history is saved. You should never need to open this, but it has to be there.
The First Commit
Before we do our first commit Git wants to know your name and email address. Git uses this information to identify who made the commit, and that information is included in the commit log. For practical purposes, this doesnt matter since writers are typically flying solo, but Git still requires it.
To set your email and address do the following:
git config --global user.email "[Your email]"
git config --global user.name "[Your name]"
Thats it. Now on to the first commit.
Lets assume there are three documents in the MyNovel folder called: Chapter1, Chapter2, and Chapter3. To save changes, we have to tell Git to track these files. To do this, type:
git add .
The period tells Git to monitor all untracked files in the folder (i.e. files for which you want to create histories). This command also tells Git to prepare any currently tracked files that have been changed. This process is called staging files for commit.
For our purposes, staging isnt so important, but it can be useful. If you make changes to Chapter 2 and Chapter 3, but only want to commit the changes in Chapter 2, you would stage Chapter 2 like so:
git add Chapter2.doc
This tells Git you want to get the changes in Chapter 2 ready for commit, but not Chapter 3.
Now, its time for the first commit:
Git commit -m "This is my first commit."
The -m is called a flag, and it tells Git you want to make a commit and tack on a message, which you see between the quotation marks. I like to use my commit messages to mark word counts. I also use them to note special information, such as: This commit includes an interview with the CEO of Acme Widgets.
If Im writing a story, I might include a message that says: This commit has the new scene where the dog runs away. Helpful messages make it easier to find your commits later.
Now that weve started tracking our documents, its time to put our writing in the cloud with GitHub. I use GitHub as an extra backup, a reliable place to look at my document changes, and a way to access my stuff on multiple PCs.
Getting Started with GitHub
 You fill out the form to create a new GitHub repository.
First, you need to sign up for a free account on GitHub (you dont need a paid account to create private repositories). However, you can only collaborate with up to three people on a private repo. If you have a team of five or more working on an article, you need to sign up for a Pro account ($7 per month, at this writing).
After you create your account, lets make a new repo. Sign in to your account and go to https://github.com/new.
The first thing we need to do is name the repository. You can use the same name you used for the folder on your PC. Under Repository Name, type MyNovel.
The Description is optional, but I like to use it. You can type something like, My fabulous new novel about a boy, a girl, and their dog, etc.
Next, select the Private radio button, but dont check the box called Initialize this repository with a README. We dont want to do that, because we already have a repository on our PC. If we create a README file right now, it makes things harder.
Next, click Create Repository. Under, Quick setup—if youve done this kind of thing before, copy the URL. It should look something like this:
https://github.com/[Your GitHub User Name]/MyNovel.git
Now, its back to the desktop and our beloved command line.
Push Your Desktop Repository to the Cloud
 Using Git on the command line.
The first time you connect a repo to GitHub, you have to use a few specialized commands. The first one is:
git remote add origin https://github.com/[Your GitHub User Name]/MyNovel.git
This tells Git a remote repository is the origin of MyNovel. The URL then points Git toward that remote origin. Dont get too hung up on the term origin; its just a convention. You can call it fluffy if you want to—origin is just easier since its the most common way to use Git.
When you upload new changes with Git, its called a push. When you download changes, its called a pull or fetch. Now, its time to push your first commit to GitHub. Heres what you do:
git push -u origin master
Youll be prompted to type your GitHub username and password. If you type your credentials correctly, everything uploads, and youre good to go.
If you want more security for your GitHub uploads, you can use an SSH key. This allows you to use a single password for the SSH key to upload, so you dont have to type your full GitHub credentials each time. Plus, only someone with the SSH key can upload file changes.
If you want more info on SSH keys, GitHub has full instructions on how to use them. You can also save your Git credentials on your PC.
Thats it! Now, when you want to commit changes to your files, you can do so with these three short commands (after you navigate to the MyNovel folder):
git add .
Translation: Hey, Git stage for commit all untracked files, as well as new changes to files youre already tracking.
git commit -m "1,000 words on the new iPhone review."
Translation: Hey Git, save these changes alongside this message.
git push origin master
Translation: Hey Git, upload the changes to the origin version of this project on GitHub from my master copy on this PC.
Git and GitHub Bonus Tips
Thats pretty much it, but here are a few extra tips to make your experience with Git and GitHub even better:
View Past Commits
 You can use GitHub to see past commits.
To view past commits, go to your MyNovel repository on GitHub. Toward the top the main page, under the Code < > tab, you see a section that says, [X] commits.
Click it, and you see a list of all your commits. Click the commit you want, and you see your text (if you typed it in plain text and not Word, that is). Everything highlighted in green was new text when the commit was created; everything in red was deleted.
Use the Pull Command
Its easy to grab a new repository on a different machine. Just navigate to where you want to save the repo on the new machine, such as cd ~/Documents. Then, type:
git pull https://github.com/[Your GitHub User Name]/MyNovel.git
Type your credentials, if prompted, and in a few seconds, youll be ready to go. Now, commit new changes, and then send them back to GitHub via git push origin master. When you get back to the PC where you usually work, just open the command line, navigate to your project folder, and type in git pull. The new changes will download, and just like that your writing project is up to date across your devices.
Dont Cross Streams
Most of the time writing isnt a team effort and involves only one person. Because of that, this article uses Git in a way that wouldnt work for a multi-person project. Specifically, we made edits directly to the master version of our novel instead of creating what are called branches. A branch is a practice version of the novel where you can make changes without affecting the original master. Its like having two different copies of your novel existing in parallel with neither affecting the other. If you like the changes in the practice branch you can merge them into the master version (or master branch). If you dont want to do that, thats fine too. Just throw away the practice branch.
Branches are very powerful, and using them would be the primary workflow with multiple writers on a single project. Solo writers dont really need to use branches, in my opinion—as long as you dont make differing changes to the master branch at the same time on multiple PCs.
For example, you should complete your work on your desktop, do your commits, and then push the changes to GitHub. Then go to your laptop and pull all the new changes down before you make any further edits. If you dont, you might end up with what Git calls conflicts. Thats when Git says, Hey, there are changes in GitHub and on this PC that dont match. Help me figure this out.
Sorting your way out of a conflict can be a pain, so its best to avoid it whenever possible.
Once you get started with Git, there are tons of things you can learn, such as branching, the difference between a fetch and a pull, what GitHubs pull requests are, and how to deal with the dreaded conflict.
Git can seem complicated to newcomers, but once you get the hang of it, its a powerful tool you can use to manage and store your writing.


